


Project Sheet
Make Your Own Compact Disc Drink Coasters
Save money saving your coffee table!
- Difficulty Level: Beginner
- Completion Time: 2 hours
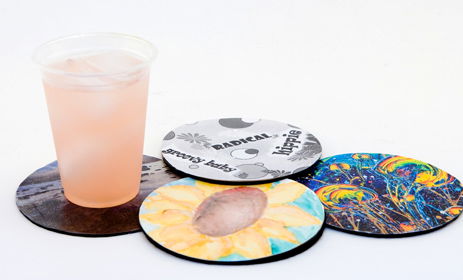 Has the digital downloading revolution left you with a massive binder full of scratchy compact discs that you never listen to anymore? Well, it's high time you started recycling those babies-- and we're not talking about hanging them from your rearview mirror, either. This fun project will take you through the step-by-step transformation from obsolete media to fine-art drink coaster! Because seriously, you're only using your old CDs to set drinks on, anyway, right?
What you'll need
You'll need to gather a few supplies before beginning work. These materials are what we'll use to customize and personalize each drink coaster. In addition to an old CD, you'll need:
- Black Felt
- Contact Paper
- Craft Knife
- Spray Adhesive
- Watercolors
- Watercolor Paper
- White Charcoal Pencil
1. Starting out
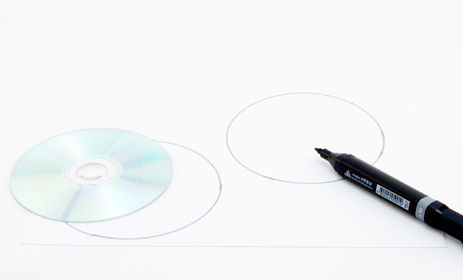 To begin, trace out the circumference of two CDs on to a piece of watercolor paper with the white pencil. Inside these circles is where we want to paint our designs. Later, we'll cut them out and attach them to our CDs.
2. A splash of color
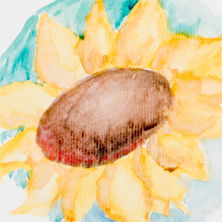 Now it's time to create our design. If you're an experienced watercolor painter, you're limited only by your imagination. Beginners can make cool paintings by sketching out a design in pencil first and then painting over it. Don't be afraid to experiment! For this project, we chose to paint flowers, but any artwork you think might make a good coaster can be used.
3. Looking sharp
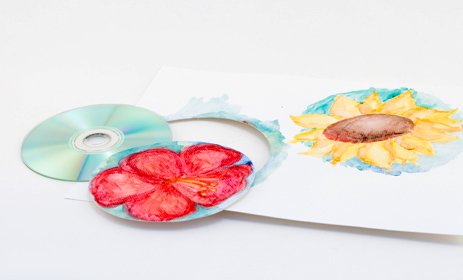 Next, it's time to cut the paintings out. We found it easiest to put a CD down on the painting and cut around it using a craft knife, but scissors work well, too. Simply take care to cut the circle large enough to cover the top of the CD.
4. A sticky spritz
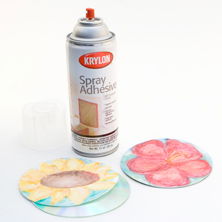 After cutting out the watercolor paintings, the next step is gluing them to the old CDs. The best CDs to use are unneeded CD-Rs, free Internet software that arrived in the mail, scratched CDs, or CDs you just don't want anymore. Give the watercolor paper a nice coat of adhesive spray and firmly affix them to the CDs.
5. Never felt so good
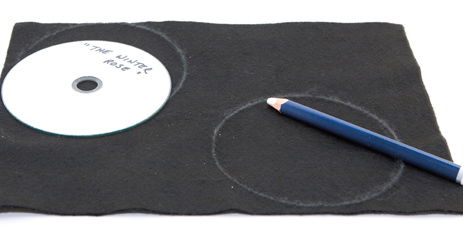 The next step is cutting out the felt that will provide a soft, furniture-friendly underside to our coasters. Just as with cutting out our paintings, we found it easiest to lay the CD down flat on the felt and cut around it using a craft knife. This ensures that we'll wind up with a perfect fit. If you're using scissors instead of a craft knife, it's probably best to trace the CDs onto the felt using the white pencil before cutting them out.
6. Spray felt sticky
 Next, spray down the felt circles with the adhesive and attach them to the recycled CDs. This works best with a nice, even coat of the stuff.
7. Making contact
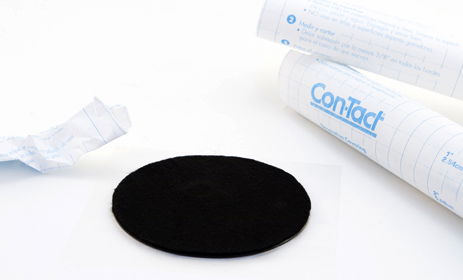 Now it's time to affix the contact paper to complete our coaster. The contact paper will keep the paintings safe from dirt and damage as well as making them waterproof, an important quality in a beverage coaster! Simply remove the paper backing from the clear plastic sheeting and press the top of the coaster down flat. Next, cut around the CD using the craft knife or scissors. This will ensure another perfect fit.
8. Experimentation
Now that you've got the hang of it, try different designs out. With enough recycled CDs, you can making matching coaster gift sets for your friends! In addition to watercolor paintings, try using photographs, magazine covers, print-outs from the Web, your kids' art, collages, and any other paper artwork.
More Project Sheets

Glow-in-the-Dark Mirror
- Difficulty Level: Beginner-Intermediate
- Completion Time: 2 Hours

Tools Silhouette Sign for Dad
- Difficulty Level: Beginner-Intermediate
- Completion Time: 1-2 Days

DIY Acrylic Pour Bracelet
- Difficulty Level: Beginner
- Completion Time: 2-3 Days

DIY Mason Jar Planter
- Difficulty Level: Advanced
- Completion Time: 2-3 Days

Marbled Ornament
- Difficulty Level: Beginner
- Completion Time: 1-2 hours

Clay Pumpkin Jar
- Difficulty Level: Beginner
- Completion Time: 1-2 hours

Pro Glow Tape Skull
- Difficulty Level: Beginner
- Completion Time: 1 hour

Personalized Pencil Pouch
- Difficulty Level: Beginner
- Completion Time: 1 hour (plus drying time)

Decorate Your Own Birdhouse
- Difficulty Level: Beginner
- Completion Time: 2-4 hours

Transparent Photo with High Gloss
- Difficulty Level: Beginner
- Completion Time: 1.5 hours

Sketching with Graphite Putty
- Difficulty Level: Beginner
- Completion Time: 8 hours

Scratch Art with Color Accents
- Difficulty Level: Beginner/Intermediate
- Completion Time: 1-3 hours

Polymer Clay Fairy House
- Difficulty Level: Intermediate
- Completion Time: ~8 hours

Experiment with Resin Casting
- Difficulty Level: Beginner/Intermediate
- Completion Time: 1-2 hours (pre-cure)

Color-Splash Vision Board
- Difficulty Level: Beginner
- Completion Time: 3-4 hours

Etched Glass Holiday Gift Jar
- Difficulty Level: Beginner/Intermediate
- Completion Time: 1 hour

Create a colorful reminder of the good things in life
- Difficulty Level: Beginner/Intermediate
- Completion Time: 1 hour

Face Painting with Custom Stencils
- Difficulty Level: Beginner/Intermediate
- Completion Time: 1 hour

Art Deco Pendant with Polymer Clay
- Difficulty Level: Beginner
- Completion Time: 1 hour

Transfer Designs with Lazertran
- Difficulty Level: Beginner
- Completion Time: 15-20 minutes

Multimedia Painting with PanPastels
- Difficulty Level: Beginner/Intermediate
- Completion Time: 1-2 hours

Special Effects with Brusho Colors
- Difficulty Level: Beginner/Intermediate
- Completion Time: 1-2 hours

Make Your Own Paper Quilling Frame
- Difficulty Level: Beginner/Intermediate
- Completion Time: 10 hours

Make Your Own Greeting Cards
- Difficulty Level: Beginner
- Completion Time: 10-30 Minutes

Make Your Own Autumn Leaves Stained-Glass
- Difficulty Level: Beginner/Intermediate
- Completion Time: 1-2 hours

Make Your Own Magnetic Alien Message Board
- Difficulty Level: Beginner
- Completion Time: 2 hours

Make Your Own Compact Disc Drink Coasters
- Difficulty Level: Beginner
- Completion Time: 2 hours

Make Your Own Crayon Candles
- Difficulty Level: Intermediate
- Completion Time: 4 hours

Make Your Own Kite
- Difficulty Level: Intermediate
- Completion Time: 3 hours

Make Your Own Masquerade Ball Masks
- Difficulty Level: Intermediate
- Completion Time: 2.5 hours

Make Your Own Multimedia Greeting Card
- Difficulty Level: Intermediate
- Completion Time: 2 hours

Make Your Own Bouquet of Photo Flowers
- Difficulty Level: Beginner
- Completion Time: 1 hours

Make Your Own Rock Zoo
- Difficulty Level: Beginner
- Completion Time: 2 hours

Make You Own Custom Sketchbook
- Difficulty Level: Intermediate
- Completion Time: 2 hours

Make Your Own Stained Glass Window
- Difficulty Level: Beginner
- Completion Time: 2 hours

Make Your Own Oil Painting T-Shirt
- Difficulty Level: Intermediate
- Completion Time: 24 hours

Make Your Own Paper Mache Bowl
- Difficulty Level: Intermediate
- Completion Time: 24 hours