


Project Sheet
Make You Own Crayon Candles
Doing it yourself, you'll save money to burn
- Difficulty Level: Intermediate
- Completion Time: 4 hours
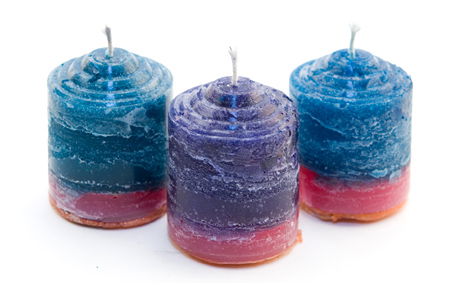 Candles are perfect for adding light to any room-- and with a little ingenuity, they can add a dash of color, too! A lot of candle makers use commercial dyes to transform plain white wax into colorful tapers, but a proper rainy-day project requires a little more creativity. If there are kids in your household, you probably have a lot of crayons lying around. Using a few art tools, we'll recycle those broken and unused crayons into gorgeous candles that you can give as gifts or use to light up your own home or studio!
What you'll need
Before getting started, we'll need to gather a few supplies:
Starting out
 To give our candles their sparkling color, we'll need to recycle some unwanted crayons. These can be broken, old, or disused crayons that you have lying around your home or studio, or you can buy some new crayons with sparkles or scents or other features that might enhance your candles. Crayons melt quicker and better if they're broken up; the best way to accomplish this is to use a crayon sharpener. Crayon shavings melt fast and evenly. Hand-cranked sharpeners and craft knives work alright, but nothing shreds a crayon more easily than an electric sharpener.
Take care to keep each color separate by dividing them into individual storage cups. Then set them aside for later use.
Which wick works?
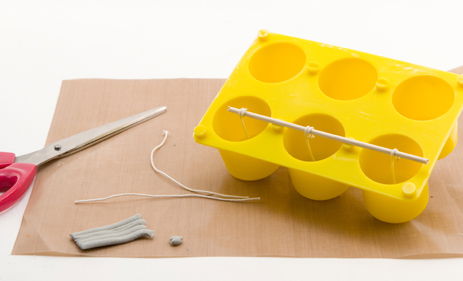 Next, it's time to trim our candle wicks to fit our mold. Some candle molds come with wicks, but once these run out you can buy more wicks at MisterArt.com. You don't have to use a store-bought mold, though-- old milk cartons, tin cans, tumblers, votives, and all sorts of other recyclable items make great candle molds. It's important that the candle wick stays straight when the candle wax gets poured into our mold, otherwise the candle won't burn well. A good way to keep the wick straight is to use a smushed pellet of candle wax or putty to secure one end of the wick to the center of the bottom of the mold. Wrap the other end of the wick around a pencil or a chopstick that will rest across the mold's top. Some candle molds include putty and dowels that you can use to achieve this same effect.
I'm melting!
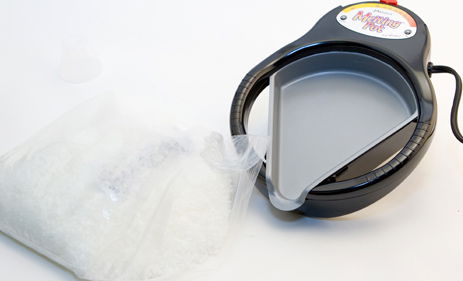 With our molds wicked and ready, it's time to heat up our candle wax. Different waxes have different melting points, but most melt at around 140 degrees. If you're using a Ranger Melting Pot, plug the pot in and set it for 140. Next, pour in some candle wax; if you'd like to make different layers of color in your candle, pour in just enough candle wax for the first layer. If you'd prefer to make a solid-colored candle, you can melt all of the wax at once.
If you don't have a Melting Pot on hand, you can use a double boiler to melt your candle wax. Some softer candle waxes, including soy way, can even be melted in the microwave.
Colorization
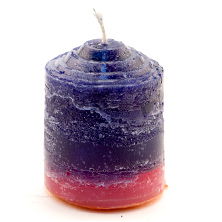
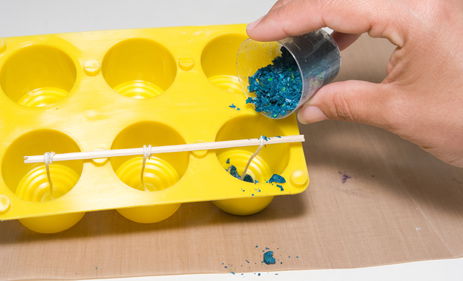 Once the candle wax has totally liquefied, it's time to add some color! First, pour crayon shavings into the mold and then pour in some molten wax. You can add one color at a time or mix colors. By stirring two or more colors together, you can create solid blends. By adding two colors without stirring, you can create weird marbling effects!
You can pour a little at a time, adding different shavings, to create distinct layers of different colors. If you'd prefer, you can fill the entire mold at once-- it's up to each crafter to decide! Keep adding wax until your mold is full.
Cool down
 Once the mold is full, let the wax rest and cool. As the wax cools down and contracts, sometimes a well or cavity will form in the center of the candle near the wick. Simply fill this cavity up with more candle wax. When the wax solidifies, you can remove the stick holding the wick straight. Once the candle has reached room temperature, it's a good idea to pop the mold in the freezer for a little while. This causes the wax to contract further and makes it easier to get the candle out of the mold.
Break 'em out
 Getting candles out of a mold can be tricky. Often it's best to pop the mold in the freezer for 15 minutes or so and then smack the mold on the edge of a table to jar the candle loose. Whatever you do, don't pull on the wick! It will slide right out of the candle.
Liquefy
With our candles hardened and ready to be lit, it's time to let our creative juices fly a little further. First, melt some crayon shavings that will look great painted on to our candles. If your candles turned out dark, lighter colors will show up best, and vice versa.
Wax on
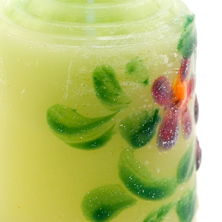 Once the crayon wax has liquefied, use a paint brush to add custom designs to the candles. Natural bristle brushes are ideal for this task because they are more heat-resistant than synthetic bristles.
Once your crayon painting is complete, it's time to display our work! Use your candles to add dashing color and romantic mood lighting to any room in your home.
More Project Sheets

Glow-in-the-Dark Mirror
- Difficulty Level: Beginner-Intermediate
- Completion Time: 2 Hours

Tools Silhouette Sign for Dad
- Difficulty Level: Beginner-Intermediate
- Completion Time: 1-2 Days

DIY Acrylic Pour Bracelet
- Difficulty Level: Beginner
- Completion Time: 2-3 Days

DIY Mason Jar Planter
- Difficulty Level: Advanced
- Completion Time: 2-3 Days

Marbled Ornament
- Difficulty Level: Beginner
- Completion Time: 1-2 hours

Clay Pumpkin Jar
- Difficulty Level: Beginner
- Completion Time: 1-2 hours

Pro Glow Tape Skull
- Difficulty Level: Beginner
- Completion Time: 1 hour

Personalized Pencil Pouch
- Difficulty Level: Beginner
- Completion Time: 1 hour (plus drying time)

Decorate Your Own Birdhouse
- Difficulty Level: Beginner
- Completion Time: 2-4 hours

Transparent Photo with High Gloss
- Difficulty Level: Beginner
- Completion Time: 1.5 hours

Sketching with Graphite Putty
- Difficulty Level: Beginner
- Completion Time: 8 hours

Scratch Art with Color Accents
- Difficulty Level: Beginner/Intermediate
- Completion Time: 1-3 hours

Polymer Clay Fairy House
- Difficulty Level: Intermediate
- Completion Time: ~8 hours

Experiment with Resin Casting
- Difficulty Level: Beginner/Intermediate
- Completion Time: 1-2 hours (pre-cure)

Color-Splash Vision Board
- Difficulty Level: Beginner
- Completion Time: 3-4 hours

Etched Glass Holiday Gift Jar
- Difficulty Level: Beginner/Intermediate
- Completion Time: 1 hour

Create a colorful reminder of the good things in life
- Difficulty Level: Beginner/Intermediate
- Completion Time: 1 hour

Face Painting with Custom Stencils
- Difficulty Level: Beginner/Intermediate
- Completion Time: 1 hour

Art Deco Pendant with Polymer Clay
- Difficulty Level: Beginner
- Completion Time: 1 hour

Transfer Designs with Lazertran
- Difficulty Level: Beginner
- Completion Time: 15-20 minutes

Multimedia Painting with PanPastels
- Difficulty Level: Beginner/Intermediate
- Completion Time: 1-2 hours

Special Effects with Brusho Colors
- Difficulty Level: Beginner/Intermediate
- Completion Time: 1-2 hours

Make Your Own Paper Quilling Frame
- Difficulty Level: Beginner/Intermediate
- Completion Time: 10 hours

Make Your Own Greeting Cards
- Difficulty Level: Beginner
- Completion Time: 10-30 Minutes

Make Your Own Autumn Leaves Stained-Glass
- Difficulty Level: Beginner/Intermediate
- Completion Time: 1-2 hours

Make Your Own Magnetic Alien Message Board
- Difficulty Level: Beginner
- Completion Time: 2 hours

Make Your Own Compact Disc Drink Coasters
- Difficulty Level: Beginner
- Completion Time: 2 hours

Make Your Own Crayon Candles
- Difficulty Level: Intermediate
- Completion Time: 4 hours

Make Your Own Kite
- Difficulty Level: Intermediate
- Completion Time: 3 hours

Make Your Own Masquerade Ball Masks
- Difficulty Level: Intermediate
- Completion Time: 2.5 hours

Make Your Own Multimedia Greeting Card
- Difficulty Level: Intermediate
- Completion Time: 2 hours

Make Your Own Bouquet of Photo Flowers
- Difficulty Level: Beginner
- Completion Time: 1 hours

Make Your Own Rock Zoo
- Difficulty Level: Beginner
- Completion Time: 2 hours

Make You Own Custom Sketchbook
- Difficulty Level: Intermediate
- Completion Time: 2 hours

Make Your Own Stained Glass Window
- Difficulty Level: Beginner
- Completion Time: 2 hours

Make Your Own Oil Painting T-Shirt
- Difficulty Level: Intermediate
- Completion Time: 24 hours

Make Your Own Paper Mache Bowl
- Difficulty Level: Intermediate
- Completion Time: 24 hours