


Project Sheet
Make Your Own Papier Mache Bowl
The perfect introduction to modern mache
- Difficulty Level: Intermediate
- Completion Time: 24 hours
 Papier mache is a messy, fun-to-work-with medium that's easy enough for kids to master yet versatile enough to create striking pieces of fine art. Papier mache starts out as a mushy glop but hardens into a rugged paper suitable for all sorts of creations, from puppets to statues to weapons and armor. Papier mache can even be used to create entire landscapes for R/C cars, model trains, or role-playing armies.
A bowl is a great shape to experiment with using papier mache. To create a bowl, artists must master the techniques required to mix, solidify, cut, paint, and finish papier mache. These same techniques can be used to make all sorts of decorations, toys, or props. Before we begin work on our papier mache bowl, however, we'll need to gather up a few supplies.
What you'll need
- Acrylic Paint
- Balloon
- Craft Knife
- Fast Mache
- Fixative
- Gesso
- Glass Tiles
- Glitter Paint
- Glue
- Masking Tape
- Mixing bowl
- Newspaper
- Non-Stick Craft Sheet
- Pencil
- Polyfoam Brush
Getting started
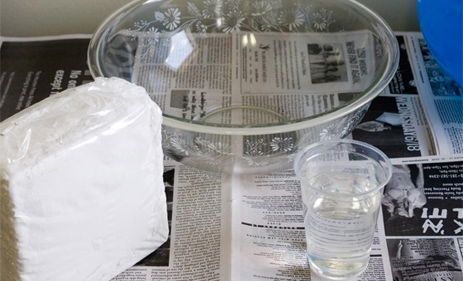 Before we start getting messy, it's a good idea to prepare an easy-to-clean workspace for this project. A simple way to do this is by covering a table, desk, or another flat surface with sheets of newspaper. This will protect your work surface from needing to be scrubbed clean later.
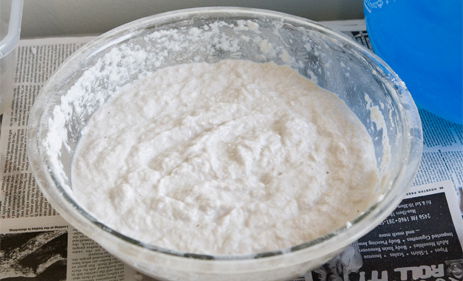 Once our workspace is ready, it's time to mix our papier mache. Papier mache is easiest to work with and apply when it's mixed with water until it's the consistency of lumpy oatmeal. Fast Mache is sturdy stuff that dries fast; for quick-drying work, mix in about 1 part water with three parts Fast Mache. Adding more water with create a thinner mixture that takes longer to dry.
Once your mixture is ready, inflate the balloon until it's a firm, round shape.
That's a wrap
 In this project, our bowl will have a textured exterior and a smoother interior. To create this smooth interior, we'll first wrap the balloon in strips of newspaper soaked in Fast Mache. To begin, tear up a newspaper into 1.5-2 in. strips, enough strips to cover the balloon. Then soak the strips in the wet Fast Mache.
 Once the newspaper strips are wet and sticky, begin wrapping the balloon up like a mummy until it's completely covered in newspaper. Be sure to smooth out the wet newspaper strips to avoid wrinkles-- remember, we're going for a smooth interior!
Sponge it on
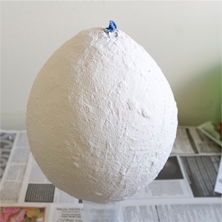 Once the ballon is completely covered in newspaper, it's time to brush on the Fast Mache. Using the sponge brush, glop on the Fast Mache until the newspaper is covered fully by a layer of wet Fast Mache about 1/8 in. thick. Use the sponge and your hands to smooth out any lumps, but not too smooth. We want the final product to have a rough, dimpled texture.
Once the balloon is covered, you can place it on top of a paper cup to dry. Depending on how much water you used to mix the Fast Mache, it will take between a few hours to overnight to dry completely.
Pouring a slab
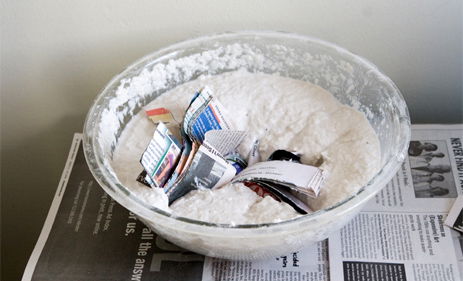
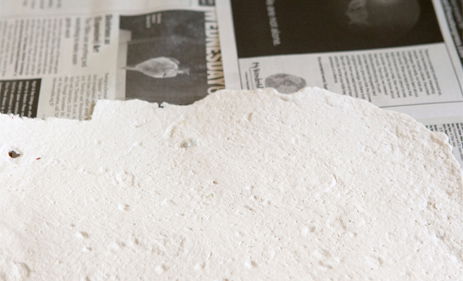 While the mache covering the balloon is drying, our next step is to pour a papier mache slab from which we can cut decorative tiles later. Simply pour some wet Fast Mache on to the Non-Stick Craft Sheet. Pat down the mache until you have a flat pancake of mache about 1/8 in. thick. Then set it aside to dry. Later we'll paint and cut it.
Going in circles
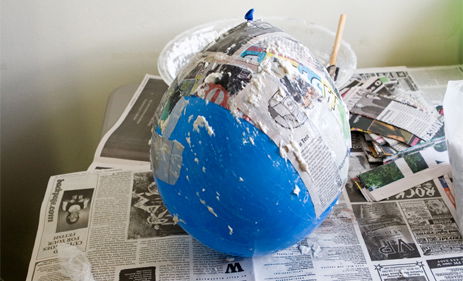
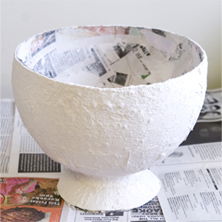
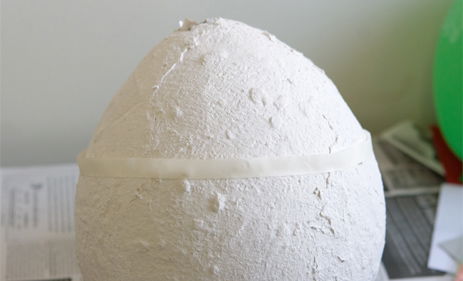 Once the mache covering the balloon is dry, it's time to cut it open. If you'd like, you can pop the balloon before we begin, but it doesn't make much difference to the outcome. First, wrap masking tape around a portion of the mache-covered balloon where the bowl's rim should go. Try to put the tape on in as straight a line as possible; if it isn't perfectly straight, however, you'll be able to even out the rim of the bowl later.
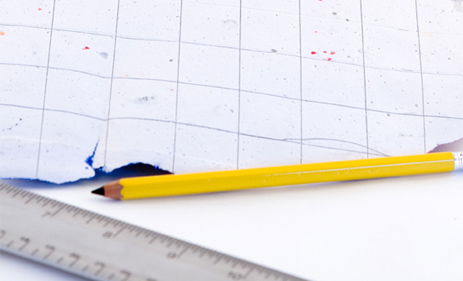
Next, use the pencil to draw a line under the masking tape. This line will be our guide when we start cutting.
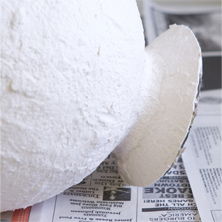
Bowl cut
Next, poke the scissors through the thin paper mache and start cutting around the guideline. When the mache is in two pieces, the larger piece should resemble a bowl.
 Once this is complete, it's time to fashion a base for our bowl so that it will be able to stand. Taking the smaller half of the balloon shape, use the same masking tape method described in our last step to cut a ring shape out of the papier mache. Using the glue, attach it wider-side-out to the bottom of the bowl.
 Once the glue has dried, use more Fast Mache to smooth out the joint between the bowl and base. If your bowl's rim came out a bit crooked, now's a good time to use extra mache to even it out, too.
Prep time
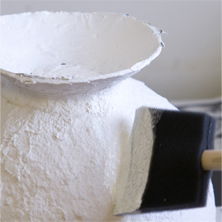 Once the fresh papier mache that we added has dried, it's time to prep our bowl to be painted. Using a clean, dry sponge brush, apply a thin layer of gesso to the inside and outside surfaces of the bowl. This will allow our paint to go on smooth and bright.
Don't forget our papier mache slab! If it warped a little during the drying process, apply the gesso heavily and its moisture will allow you to flatten the slab back down.
Colorization
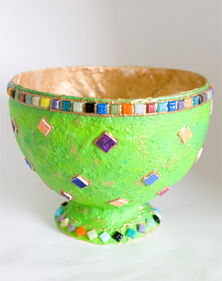
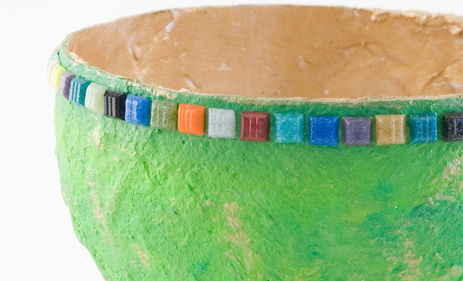
 After the gesso has dried, it's time to paint! Acrylic paints work best, but other poster paints or craft paints work well, too. For this example, we chose to paint the exterior a pale green and the interior a metallic gold. Then we went back and added a few gold highlights to the exterior, too. Naturally, you're free to choose whatever colors strike your fancy!
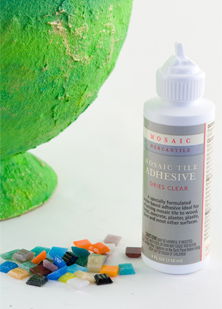
Once the paint is dry, use glue or tile adhesive to attach the mosaic tiles in decorative patterns to the bowl. In this example, we used the tiles to decorate the bowl's rim and base.
Back to the slab
 While the glue dries, let's turn to our slab. By cutting it into pieces, we can create our own custom mache tiles. On the non-gessoed side of the slab, you can use a pencil to draw designs or patterns to cut out.
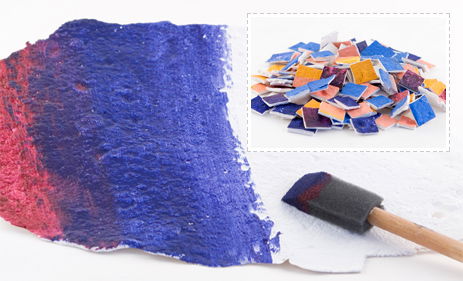 In our example, we chose to use square tiles, so we painted the entire slab in a rainbow pattern before cutting the tiles out. If you'd like to create custom-shaped tiles, it may be easier to cut them out first before painting them.
Once the tiles have been cut out and painted, use glue or tile adhesive to attach them to the bowl.
In our example, we used gold glitter paint to mimic the look or grouting around our tiles. You can also use glitter paint to add swirls, designs, and text to your bowl.
Finishing up
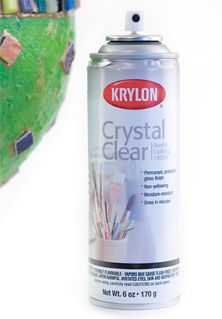 Once the glitter paint is dry, it's time to give our bowl a protective, glossy finish. By using a spray fixative, we'll have a bowl with a hard acrylic coating protecting our artistic flourishes from scratches and water damage. Just spray on a nice coat with the aerosol can.
Just let the fixative dry and we're done! Choose a nice decorative place for the bowl where everyone can enjoy it.
More Project Sheets

Glow-in-the-Dark Mirror
- Difficulty Level: Beginner-Intermediate
- Completion Time: 2 Hours

Tools Silhouette Sign for Dad
- Difficulty Level: Beginner-Intermediate
- Completion Time: 1-2 Days

DIY Acrylic Pour Bracelet
- Difficulty Level: Beginner
- Completion Time: 2-3 Days

DIY Mason Jar Planter
- Difficulty Level: Advanced
- Completion Time: 2-3 Days

Marbled Ornament
- Difficulty Level: Beginner
- Completion Time: 1-2 hours

Clay Pumpkin Jar
- Difficulty Level: Beginner
- Completion Time: 1-2 hours

Pro Glow Tape Skull
- Difficulty Level: Beginner
- Completion Time: 1 hour

Personalized Pencil Pouch
- Difficulty Level: Beginner
- Completion Time: 1 hour (plus drying time)

Decorate Your Own Birdhouse
- Difficulty Level: Beginner
- Completion Time: 2-4 hours

Transparent Photo with High Gloss
- Difficulty Level: Beginner
- Completion Time: 1.5 hours

Sketching with Graphite Putty
- Difficulty Level: Beginner
- Completion Time: 8 hours

Scratch Art with Color Accents
- Difficulty Level: Beginner/Intermediate
- Completion Time: 1-3 hours

Polymer Clay Fairy House
- Difficulty Level: Intermediate
- Completion Time: ~8 hours

Experiment with Resin Casting
- Difficulty Level: Beginner/Intermediate
- Completion Time: 1-2 hours (pre-cure)

Color-Splash Vision Board
- Difficulty Level: Beginner
- Completion Time: 3-4 hours

Etched Glass Holiday Gift Jar
- Difficulty Level: Beginner/Intermediate
- Completion Time: 1 hour

Create a colorful reminder of the good things in life
- Difficulty Level: Beginner/Intermediate
- Completion Time: 1 hour

Face Painting with Custom Stencils
- Difficulty Level: Beginner/Intermediate
- Completion Time: 1 hour

Art Deco Pendant with Polymer Clay
- Difficulty Level: Beginner
- Completion Time: 1 hour

Transfer Designs with Lazertran
- Difficulty Level: Beginner
- Completion Time: 15-20 minutes

Multimedia Painting with PanPastels
- Difficulty Level: Beginner/Intermediate
- Completion Time: 1-2 hours

Special Effects with Brusho Colors
- Difficulty Level: Beginner/Intermediate
- Completion Time: 1-2 hours

Make Your Own Paper Quilling Frame
- Difficulty Level: Beginner/Intermediate
- Completion Time: 10 hours

Make Your Own Greeting Cards
- Difficulty Level: Beginner
- Completion Time: 10-30 Minutes

Make Your Own Autumn Leaves Stained-Glass
- Difficulty Level: Beginner/Intermediate
- Completion Time: 1-2 hours

Make Your Own Magnetic Alien Message Board
- Difficulty Level: Beginner
- Completion Time: 2 hours

Make Your Own Compact Disc Drink Coasters
- Difficulty Level: Beginner
- Completion Time: 2 hours

Make Your Own Crayon Candles
- Difficulty Level: Intermediate
- Completion Time: 4 hours

Make Your Own Kite
- Difficulty Level: Intermediate
- Completion Time: 3 hours

Make Your Own Masquerade Ball Masks
- Difficulty Level: Intermediate
- Completion Time: 2.5 hours

Make Your Own Multimedia Greeting Card
- Difficulty Level: Intermediate
- Completion Time: 2 hours

Make Your Own Bouquet of Photo Flowers
- Difficulty Level: Beginner
- Completion Time: 1 hours

Make Your Own Rock Zoo
- Difficulty Level: Beginner
- Completion Time: 2 hours

Make You Own Custom Sketchbook
- Difficulty Level: Intermediate
- Completion Time: 2 hours

Make Your Own Stained Glass Window
- Difficulty Level: Beginner
- Completion Time: 2 hours

Make Your Own Oil Painting T-Shirt
- Difficulty Level: Intermediate
- Completion Time: 24 hours

Make Your Own Paper Mache Bowl
- Difficulty Level: Intermediate
- Completion Time: 24 hours