


Project Sheet
Make Your Own Clay Pumpkin Jar!
- Difficulty Level: Beginner to Intermediate
- Completion Time: 1-2 hours (plus dry time)
Watch a video overview:
As we get closer to the holidays, we reflect on the past year and look forward to upcoming adventures. More importantly, the holidays are made bright & merry by those who surround us at the dinner table and under the Christmas tree.
This holiday season, create The “Be Great!” Pumpkin Jar with this DIY tutorial.
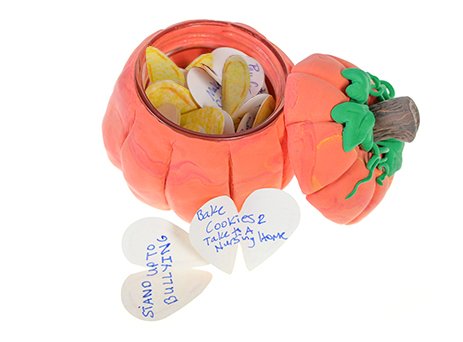 After we created the Pumpkin jar, we wanted it to do more than just sit on a counter and look pretty. So, to give it meaningful value, we grabbed our favorite heart-shaped craft punch & created our own “acts of kindness cards” in the style of pumpkin seeds to place inside the Pumpkin Jar. A very simple idea, but one that can be a reminder for our children & family to value others - and life itself - during the holiday season.
What You'll Need
 Before you
begin, make sure you have all the supplies you'll need. The list below contains all the products we used to create
the example shown in this demo. Materials are optional based upon your own design.
Before you
begin, make sure you have all the supplies you'll need. The list below contains all the products we used to create
the example shown in this demo. Materials are optional based upon your own design.
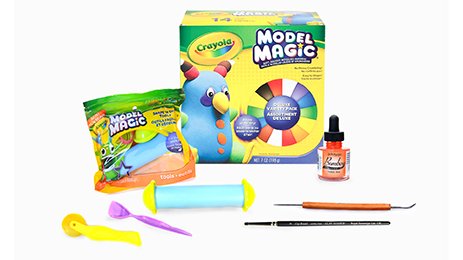
- Crayola Model Magic Deluxe Assortment (We used white, orange, yellow, red, green, brown, and black.)
- Crayola Model Magic Tools - Shape 'N Cut Set (Kid friendly!)
- Dr. Ph. Martin’s Bombay India Ink (orange or tangerine)
- Modeling Tools and/or Lace Draping Tool (These help to attach small pieces, create details, and form textures.) (or something similar)
- A Glass Jar or Container (We repurposed a 4.5 oz minced garlic jar . However, use any jar you have on hand that fits your decorative or functional purpose).
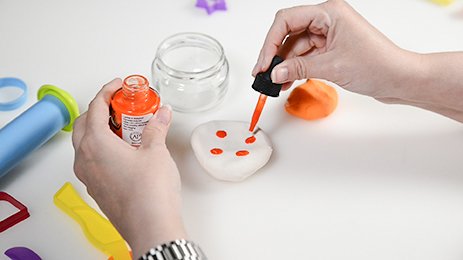
ARTISTIC TIP: Crayola Model Magic is available in a variety of colors that are intermixable to create tints and shades or even a marbled look. For this DIY, we used Model Magic in white, orange, red, and yellow and mixed in tangerine India Ink for additional variation. You can also color the clay by mixing in paint, pigments, and powders or alternatively paint the outside after it is dry.
1. Color Mixing
 Form a ball of white clay about the size of tennis ball or larger depending on your container’s size. Clay can be added as needed but for a more consistent marbled color, it is best to mix enough clay at one time to create both the pumpkin base and save some for the lid. Set aside about ⅓ of the mixed clay for the lid and bottom of the jar.
Roll, squeeze and flatten the clay into your palm to get a feel for it (have some fun)! If mixing in ink or other paints, wear gloves to avoid staining your hands. Press the center into a slight curve to catch the ink. Apply 4-5 ink droplets onto the clay and knead it into the clay by twisting & rolling. Notice how the ink begins creating a marbled look. Mix in additional ink until the desired color and texture is achieved. The more your mix, the more solid the color. Stop sooner rather than later to keep more marbled stripes.
2. Slab Roll Out
 Flatten the clay first with your hands and then with the rolling pin from the Shape ‘N Cut tool set. Roll over the clay, flipping it multiple times until it’s similar to a thin pancake. Elongate the shape by slowly stretching it from two sides and gently tapping it on the working surface until forming a long & wide strip. Use the rolling pin again to ensure even thickness.
3. Wrap It Up
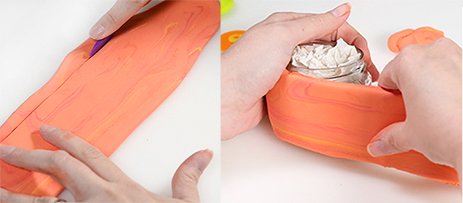 Using the kid-friendly sculpting tool, trim the longest sides to create a strip that has the same height as the jar without the lid (save the removed clay). Wrap your neatly trimmed & flattened clay around your glass jar. Press the clay firmly and tear or cut away excess. Use the leftover clay to cover the bottom of the jar & slightly flatten the bottom to ensure your pumpkin jar will sit upright.
ARTISTIC TIP: While covering the jar, keep in mind you don’t want the clay to mount over the mouth of the jar. Instead, keep a small sliver of the lip of the jar visible for a smooth, strong edge.
4. Pumpkin Grooves
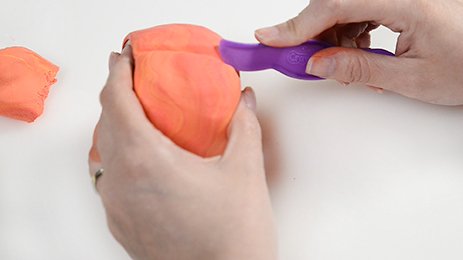 Using the sculpting tool, create vertical creases in the clay (you know, like a pumpkin!). Pass over the groove multiple times and tilt the tool to widen the divide for a plump texture to the pumpkin’s ridges.
5. Form a Pumpkin Stem
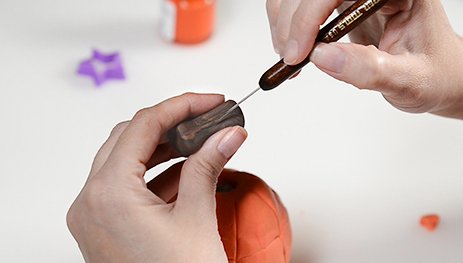 Next, twist and combine about a quarter-sized amount of black and brown Model Magic Clay to create a dark brown marbled color. Shape the clay into a stem, making the base slightly wider and a bit curved. Using a draping tool, scratch thin lines up and down the stem to create a realistic pattern. Set aside so it firms up a bit before attaching.
6. A Stem for a Handle
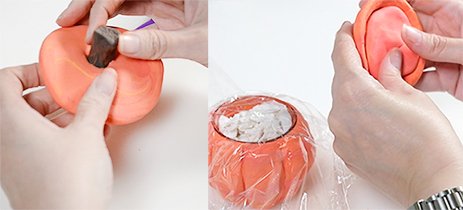 Using the remainder of the orange clay, create a round & flat disk shape at least ¼” wider than the mouth of the jar. Use the sculpting tool to cut a hole in the middle (nickel size) & then take the stem and push it through from the bottom. Use your fingers to gently attach the stem to the lid. Grab some more orange clay and mound it into the bottom center (inside) of the lid. This both strengthens the lid and keeps it from sliding off of the jar.
7. Match the Top to the Bottom
 Place plastic wrap over the bottom of the jar and gently place the lid on top. The plastic wrap will ensure that the two pieces do not join but that they have a snug fit, keeping them together. Slightly press down around the stem to create the natural caved in area around the pumpkin’s stem. Use the sculpting tool again to create vertical creases on the lid matching the creases you already created on the jar.
8. Add a Touch of Greenery
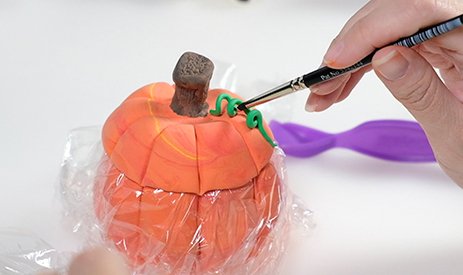 Grab some green Model Magic Clay and roll coils with your hand to create a thin line. Place the clay gently on the top of the jar, twisting the clay to create spirals, like the curly tail of a pig. Keep adding green spirals to your heart’s desire. Then, take a tiny piece of green clay, and use the draping tool to create leaves and adhere those around the spirals, adding as many leaves as you want.
9. That’s a Great Pumpkin, Charlie Brown!
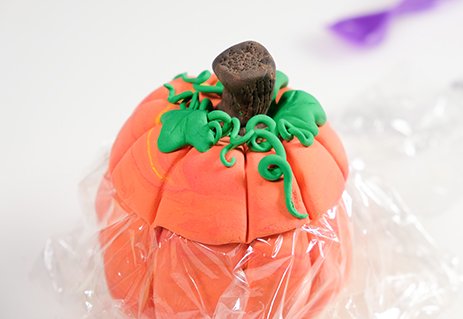 Allow your pumpkin jar to air dry overnight before removing the lid and plastic wrap! Then remove the plastic and allow the lid and jar to dry fully separately. We recommend flipping the bottom of the jar to expose the base of the pumpkin to the air evenly. Crayola Model Magic generally dries to the touch in 24 hours and completely in approximately 72 hours - depending on the thickness of your application and environmental conditions. Voilà!
More Project Sheets

Glow-in-the-Dark Mirror
- Difficulty Level: Beginner-Intermediate
- Completion Time: 2 Hours

Tools Silhouette Sign for Dad
- Difficulty Level: Beginner-Intermediate
- Completion Time: 1-2 Days

DIY Acrylic Pour Bracelet
- Difficulty Level: Beginner
- Completion Time: 2-3 Days

DIY Mason Jar Planter
- Difficulty Level: Advanced
- Completion Time: 2-3 Days

Marbled Ornament
- Difficulty Level: Beginner
- Completion Time: 1-2 hours

Clay Pumpkin Jar
- Difficulty Level: Beginner
- Completion Time: 1-2 hours

Pro Glow Tape Skull
- Difficulty Level: Beginner
- Completion Time: 1 hour

Personalized Pencil Pouch
- Difficulty Level: Beginner
- Completion Time: 1 hour (plus drying time)

Decorate Your Own Birdhouse
- Difficulty Level: Beginner
- Completion Time: 2-4 hours

Transparent Photo with High Gloss
- Difficulty Level: Beginner
- Completion Time: 1.5 hours

Sketching with Graphite Putty
- Difficulty Level: Beginner
- Completion Time: 8 hours

Scratch Art with Color Accents
- Difficulty Level: Beginner/Intermediate
- Completion Time: 1-3 hours

Polymer Clay Fairy House
- Difficulty Level: Intermediate
- Completion Time: ~8 hours

Experiment with Resin Casting
- Difficulty Level: Beginner/Intermediate
- Completion Time: 1-2 hours (pre-cure)

Color-Splash Vision Board
- Difficulty Level: Beginner
- Completion Time: 3-4 hours

Etched Glass Holiday Gift Jar
- Difficulty Level: Beginner/Intermediate
- Completion Time: 1 hour

Create a colorful reminder of the good things in life
- Difficulty Level: Beginner/Intermediate
- Completion Time: 1 hour

Face Painting with Custom Stencils
- Difficulty Level: Beginner/Intermediate
- Completion Time: 1 hour

Art Deco Pendant with Polymer Clay
- Difficulty Level: Beginner
- Completion Time: 1 hour

Transfer Designs with Lazertran
- Difficulty Level: Beginner
- Completion Time: 15-20 minutes

Multimedia Painting with PanPastels
- Difficulty Level: Beginner/Intermediate
- Completion Time: 1-2 hours

Special Effects with Brusho Colors
- Difficulty Level: Beginner/Intermediate
- Completion Time: 1-2 hours

Make Your Own Paper Quilling Frame
- Difficulty Level: Beginner/Intermediate
- Completion Time: 10 hours

Make Your Own Greeting Cards
- Difficulty Level: Beginner
- Completion Time: 10-30 Minutes

Make Your Own Autumn Leaves Stained-Glass
- Difficulty Level: Beginner/Intermediate
- Completion Time: 1-2 hours

Make Your Own Magnetic Alien Message Board
- Difficulty Level: Beginner
- Completion Time: 2 hours

Make Your Own Compact Disc Drink Coasters
- Difficulty Level: Beginner
- Completion Time: 2 hours

Make Your Own Crayon Candles
- Difficulty Level: Intermediate
- Completion Time: 4 hours

Make Your Own Kite
- Difficulty Level: Intermediate
- Completion Time: 3 hours

Make Your Own Masquerade Ball Masks
- Difficulty Level: Intermediate
- Completion Time: 2.5 hours

Make Your Own Multimedia Greeting Card
- Difficulty Level: Intermediate
- Completion Time: 2 hours

Make Your Own Bouquet of Photo Flowers
- Difficulty Level: Beginner
- Completion Time: 1 hours

Make Your Own Rock Zoo
- Difficulty Level: Beginner
- Completion Time: 2 hours

Make You Own Custom Sketchbook
- Difficulty Level: Intermediate
- Completion Time: 2 hours

Make Your Own Stained Glass Window
- Difficulty Level: Beginner
- Completion Time: 2 hours

Make Your Own Oil Painting T-Shirt
- Difficulty Level: Intermediate
- Completion Time: 24 hours

Make Your Own Paper Mache Bowl
- Difficulty Level: Intermediate
- Completion Time: 24 hours