


Project Sheet
Face Painting with Custom Stencils
Make your next costume stand out with your very own designs.
- Difficulty Level: Beginner/Intermediate
- Completion Time: 1 hour
Watch a video overview:
Whether you're getting geared up to express your school spirit, supporting your favorite team, or getting into character for a costume party, these face painting tools offer customization and quality for repeated use. The Creative Versa-Tool makes cutting original stencil designs fast and easy on your hands as it takes a light, smooth touch. Enjoy the benefits of speed and consistency by transferring your initial design and use the stencil impression as a guide to add outlines, highlights, and embellishments.
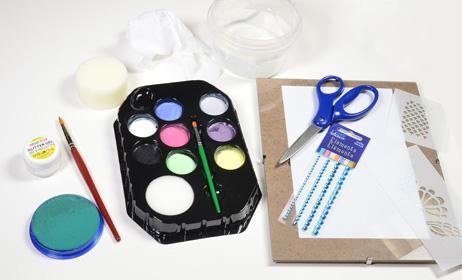
What you'll need
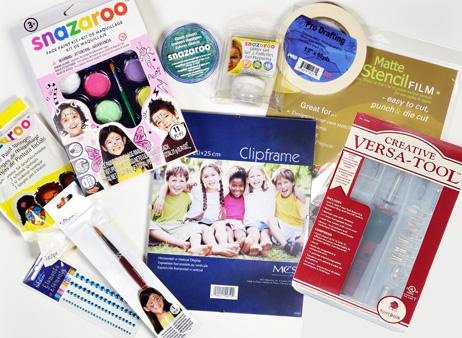 Before you begin, make sure you have all the supplies you'll need. The list below contains all the products we used to create the example shown in this demo. Materials are optional based upon your own design.
- Creative Versa-Tool
- Stencil Film 9 in. x 12 in., medium weight, Frosted Matte
- Clip Frame (sheet of glass)
- Face Painting Kit - Girls/Fantasy
- Face Paint Colors - Teal
- High Density Sponges
- Multipurpose Face Painting Brush
- Scissors
- Drafting Tape (or other easy-release tape)
- Cup of water
- Baby wipes or damp paper towels
Optional Embellishments:
- Crystal Sticker Elements
- Face and Body Glitter Gel – Star Dust
1. Prepare Your Stencil Designs
 Print a pattern or design with a Creative Commons or Royalty Free License or draw one of your own on paper. Keep in mind the intended area of application to determine the appropriate size. The design needs to connect interior areas securely to the outside edge - like maintaining the masking for the inside of the letter “O.” Include at least a ¼ inch border around the outside edge and areas to help you hold the stencil during painting. Think of the design like a group of windows; whatever is cut away will receive paint.
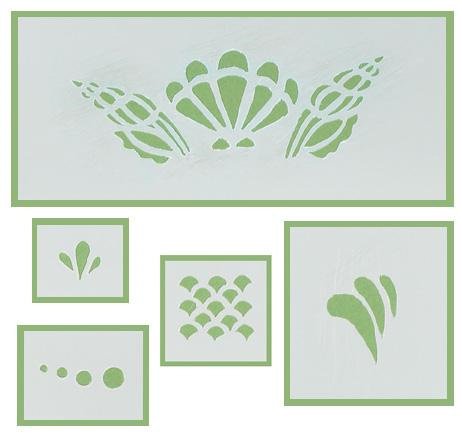 For our mermaid design, we created a seashell crown piece. We placed the 3 center shells together on one stencil and chose to create separate pieces for the surrounding details. This makes the stencil arrangement adjustable to accommodate different facial features and sizes.
2. Assemble Your Workspace
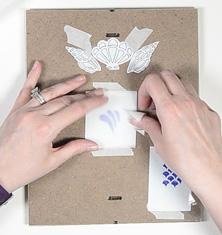 Tape the paper design onto the frame backing board, beneath the glass of the clip frame. The paper drawing/printout stays protected by the glass covering. Cut a piece from the stencil film that is at least ¼ inch larger than the design area. Tape the stencil film on top of the glass. Reattach the clips to the frame.
Tip:
- The MCS Clip Frame has smoothed edges making it safe to handle. If using a different sheet of glass from other sources, consider applying a layer of tape around all four sides for protection from sharp edges.
3. Cut Your Stencils
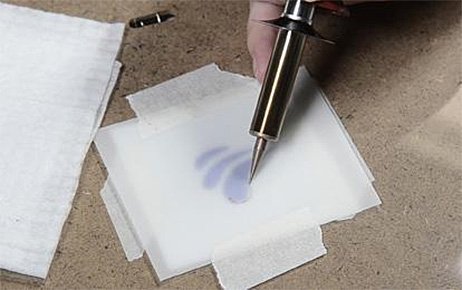 Attach the tapered point to the Creative Versa-Tool and preheat. Smoothly trace the design into the stencil paper. Caution: The metal components cause serious burns if mishandled - not for use by children.
Tips:
- Keep moving along the design to avoid burning away more of the film than desired.
- Have a damp paper towel/baby wipe handy to remove any stuck on plastic from the tapered point while you work. If melted plastic sticks to the tip, quickly drag it along the damp surface. Never touch the hot tip with your fingers.
- Optional: use a fine grain sandpaper to smooth any rough edges from the stencil. This may be useful if planning to flip the design for mirror image applications and helps with paint removal from the stencil during cleanup.
- Stencils made with this film may be reused for face painting or other mixed media applications on paper or other absorbent surfaces.
- Optional: test your stencil or practice on scrap paper. Make any corrections with the hot knife prior to facial application.
4. Prepare Your Sponge
 Dip the face painting sponge into water and wring out the excess. Rub the sponge along the face painting cake repeatedly to fully load the sponge and avoid runny application that can seep underneath the stencil pattern.
Tip:
- Cut the sponge in half and load each side with a different color. It makes application easier and allows for quick blending of colors.
5. Apply Paint Using Stencils
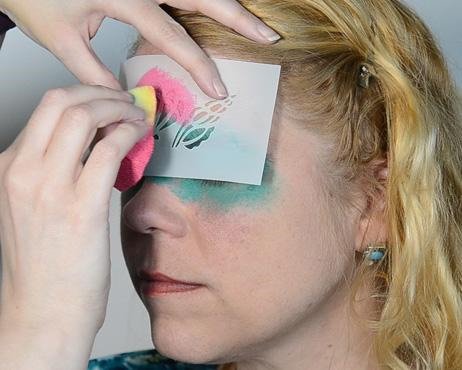 Tape or firmly press the stencil onto the skin. Gently dab the sponge over the stencil design while holding the stencil up against the skin. If there is open space between the skin and the stencil, the paint bleeds behind it. More than one color may be layered within the stencil patterns.
Tips:
- Use the back of your hand to test paint consistency before applying to the stencil. If too wet, either dab on paper towel or load more paint.
- Optional, apply a soft background layer of color prior to stencil application. This will add color to the outline edges of the stencil.
- If a specific shade is desired, use the glass clip frame as a palette to premix colors.
- Work in different areas across the face to allow previous areas to dry.
6. Add Detail
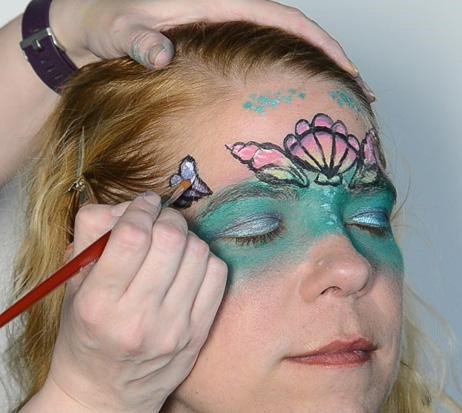 Wet the universal brush and load the bristles with the desired color. Apply highlights, details, and outlining.
Tip:
- If the colors of the paint cakes get dirty, use a baby wipe or damp paper towel to gently wipe away the surface layer to clean.
7. Final Touches
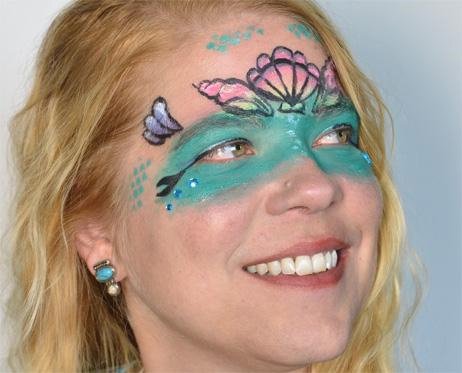 Add embellishments such as glitter gel, acrylic gems, or rhinestones.
More Project Sheets

Glow-in-the-Dark Mirror
- Difficulty Level: Beginner-Intermediate
- Completion Time: 2 Hours

Tools Silhouette Sign for Dad
- Difficulty Level: Beginner-Intermediate
- Completion Time: 1-2 Days

DIY Acrylic Pour Bracelet
- Difficulty Level: Beginner
- Completion Time: 2-3 Days

DIY Mason Jar Planter
- Difficulty Level: Advanced
- Completion Time: 2-3 Days

Marbled Ornament
- Difficulty Level: Beginner
- Completion Time: 1-2 hours

Clay Pumpkin Jar
- Difficulty Level: Beginner
- Completion Time: 1-2 hours

Pro Glow Tape Skull
- Difficulty Level: Beginner
- Completion Time: 1 hour

Personalized Pencil Pouch
- Difficulty Level: Beginner
- Completion Time: 1 hour (plus drying time)

Decorate Your Own Birdhouse
- Difficulty Level: Beginner
- Completion Time: 2-4 hours

Transparent Photo with High Gloss
- Difficulty Level: Beginner
- Completion Time: 1.5 hours

Sketching with Graphite Putty
- Difficulty Level: Beginner
- Completion Time: 8 hours

Scratch Art with Color Accents
- Difficulty Level: Beginner/Intermediate
- Completion Time: 1-3 hours

Polymer Clay Fairy House
- Difficulty Level: Intermediate
- Completion Time: ~8 hours

Experiment with Resin Casting
- Difficulty Level: Beginner/Intermediate
- Completion Time: 1-2 hours (pre-cure)

Color-Splash Vision Board
- Difficulty Level: Beginner
- Completion Time: 3-4 hours

Etched Glass Holiday Gift Jar
- Difficulty Level: Beginner/Intermediate
- Completion Time: 1 hour

Create a colorful reminder of the good things in life
- Difficulty Level: Beginner/Intermediate
- Completion Time: 1 hour

Face Painting with Custom Stencils
- Difficulty Level: Beginner/Intermediate
- Completion Time: 1 hour

Art Deco Pendant with Polymer Clay
- Difficulty Level: Beginner
- Completion Time: 1 hour

Transfer Designs with Lazertran
- Difficulty Level: Beginner
- Completion Time: 15-20 minutes

Multimedia Painting with PanPastels
- Difficulty Level: Beginner/Intermediate
- Completion Time: 1-2 hours

Special Effects with Brusho Colors
- Difficulty Level: Beginner/Intermediate
- Completion Time: 1-2 hours

Make Your Own Paper Quilling Frame
- Difficulty Level: Beginner/Intermediate
- Completion Time: 10 hours

Make Your Own Greeting Cards
- Difficulty Level: Beginner
- Completion Time: 10-30 Minutes

Make Your Own Autumn Leaves Stained-Glass
- Difficulty Level: Beginner/Intermediate
- Completion Time: 1-2 hours

Make Your Own Magnetic Alien Message Board
- Difficulty Level: Beginner
- Completion Time: 2 hours

Make Your Own Compact Disc Drink Coasters
- Difficulty Level: Beginner
- Completion Time: 2 hours

Make Your Own Crayon Candles
- Difficulty Level: Intermediate
- Completion Time: 4 hours

Make Your Own Kite
- Difficulty Level: Intermediate
- Completion Time: 3 hours

Make Your Own Masquerade Ball Masks
- Difficulty Level: Intermediate
- Completion Time: 2.5 hours

Make Your Own Multimedia Greeting Card
- Difficulty Level: Intermediate
- Completion Time: 2 hours

Make Your Own Bouquet of Photo Flowers
- Difficulty Level: Beginner
- Completion Time: 1 hours

Make Your Own Rock Zoo
- Difficulty Level: Beginner
- Completion Time: 2 hours

Make You Own Custom Sketchbook
- Difficulty Level: Intermediate
- Completion Time: 2 hours

Make Your Own Stained Glass Window
- Difficulty Level: Beginner
- Completion Time: 2 hours

Make Your Own Oil Painting T-Shirt
- Difficulty Level: Intermediate
- Completion Time: 24 hours

Make Your Own Paper Mache Bowl
- Difficulty Level: Intermediate
- Completion Time: 24 hours