


Project Sheet
Color-Splash Vision Board
Start something new with focus and inspiration.
- Difficulty Level: Beginner
- Completion Time: 3-4 hours
Watch a video overview:
Vision boards have gained popularity in recent years, and those who create them find them indispensable for focus and inspiration while pursuing goals and dreams. Our version uses non-traditional techniques, including chalkboard panels that can be updated as you make progress, since your goals will grow and change. We were also able to reuse supplies from some of our most popular past projects!
Things to keep in mind when you’re putting your own vision board together:
- Being very specific about your goals will help. In this example, the artist is a writer and aspiring screenwriter, so she chose messages that pertained to that choice of path, along with general messages of motivation.
- Quotes and words that inspire you are a great start, but make sure you include your own words, too! Stick-on letters let you add thoughts, mottos, mantras, etc. in your words or those of a loved one who inspires you.
Personal touches, whether they are “relevant” to the specific focus of your vision board, make it even more meaningful. Our artist is a fan of bright colors and all things New Orleans, so she chose feathers and fleurs-de-lis to add personality to her board. Whether you choose a clean, modern style, a photo-heavy layout, or any other style that suits you, remember to make it something that will be uplifting and inspiring to you whenever you see it.
What You'll Need
 Before you begin, make sure you have all the supplies you'll need. The list below contains all the products we used to create the example shown in this demo. Materials are optional based upon your own design.
- Watercolor Canvas Board
- Pouring Medium
- Brusho Colors Watercolor Crystals (as seen in our Brusho Colors demo)
- Glitter Spray
- Scissors
- Craft Paper Scraps (as seen in our Greeting Cards project)
- Chalk Foam Board (as seen in our Gratitude Board project)
- Adhesive Letters/Phrases
- Decorative Stickers
- Filmstrip Ribbon
- Craft Feathers
- Chalk Markers (also seen in our Gratitude Board project)
- Inspiring clippings and photos from magazines, books, etc.
1. Choose Your Words
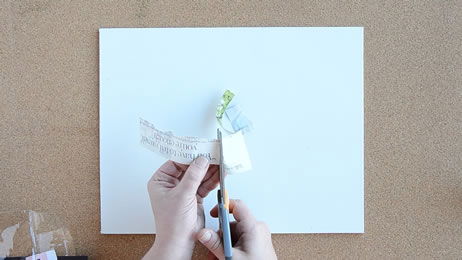 If desired, cut out inspiring words, phrases, or photos from magazines or other printed sources. You may wish to mount some of them – particularly smaller clippings – on scrap paper to make them stand out more.
2. Apply Your Background
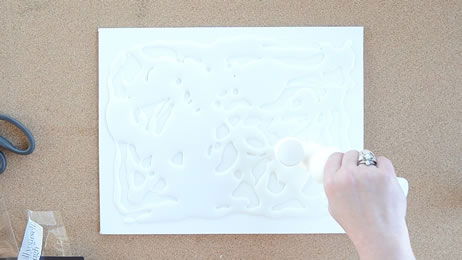 On a protected surface, pour the medium onto the canvas to cover it. Adjust as necessary for the thickness and coverage you want.
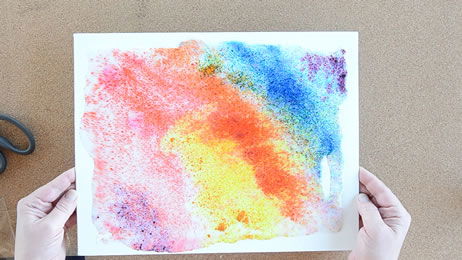
 Lightly shake your chosen Brusho colors and allow to blend into the medium. To enhance marbling/swirling effect, tilt your board in various directions. Allow to dry (at least 2-3 hours depending upon thickness).
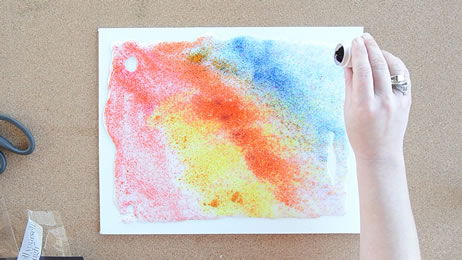
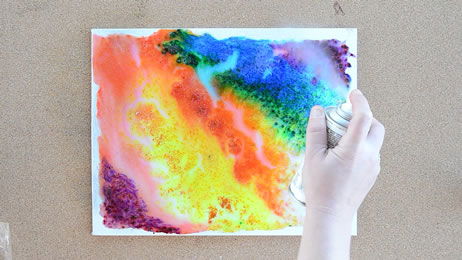 Cover background with a layer of glitter spray. Allow to dry, approximately 15-30 minutes. If you want a more dramatic effect, you can also shake regular glitter onto the medium while it is still wet.
3. Now, Use Your Words
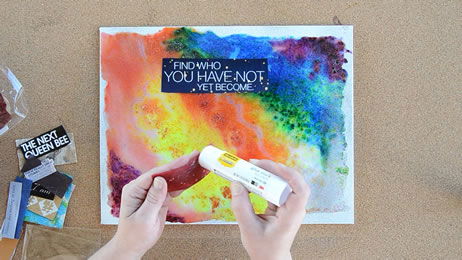 Lay out your clippings and paper to determine the best placement for them. (Make sure to leave space for your chalkboard shapes and other additions – in this case, the feathers and bow.) Apply using the glue stick. At this point, you can apply a coat of gel medium, if desired, to protect and preserve your work.
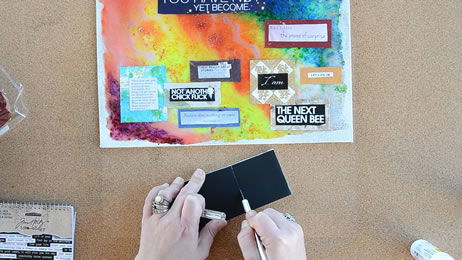 Cut out your shapes from a piece of chalk foam board, and apply with Aqua glue. (If planning to apply gel medium, place stickers and other accents first.)
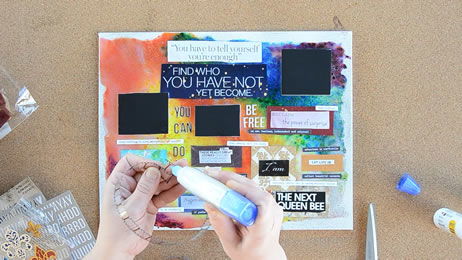
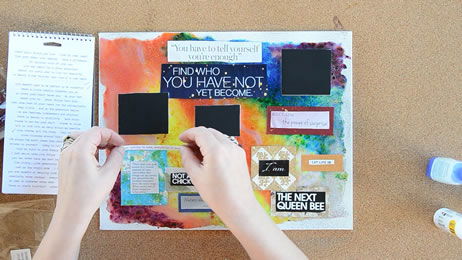 Accent the larger messages with your favorite phrases from the stickers…
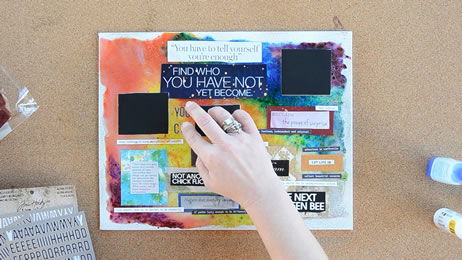 …and add your own personal words and phrases with letter stickers.
4. Dress It Up
 Cut three pieces of the filmstrip ribbon to three different lengths. Glue each into a circle and allow to dry; then pinch the opposite side of each circle to the middle and glue in place to form a bow shape.
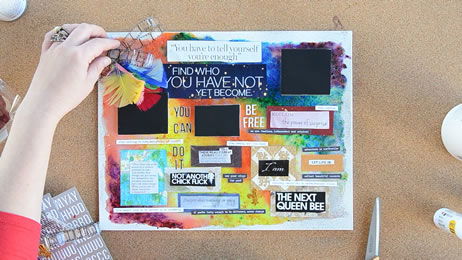 Glue or otherwise secure feathers to form a plume. Glue to an empty corner of the board. Stack and glue each bow atop the feathers. Add a sticker to the center.
5. Start Setting Your Goals!
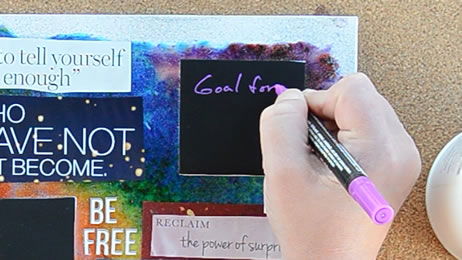 You’re now ready to use your vision board – with your chalk pens, you can write down short-term goals, thoughts and ideas you have, quotes, and anything that inspires you. Change them as often as you wish!
More Project Sheets

Glow-in-the-Dark Mirror
- Difficulty Level: Beginner-Intermediate
- Completion Time: 2 Hours

Tools Silhouette Sign for Dad
- Difficulty Level: Beginner-Intermediate
- Completion Time: 1-2 Days

DIY Acrylic Pour Bracelet
- Difficulty Level: Beginner
- Completion Time: 2-3 Days

DIY Mason Jar Planter
- Difficulty Level: Advanced
- Completion Time: 2-3 Days

Marbled Ornament
- Difficulty Level: Beginner
- Completion Time: 1-2 hours

Clay Pumpkin Jar
- Difficulty Level: Beginner
- Completion Time: 1-2 hours

Pro Glow Tape Skull
- Difficulty Level: Beginner
- Completion Time: 1 hour

Personalized Pencil Pouch
- Difficulty Level: Beginner
- Completion Time: 1 hour (plus drying time)

Decorate Your Own Birdhouse
- Difficulty Level: Beginner
- Completion Time: 2-4 hours

Transparent Photo with High Gloss
- Difficulty Level: Beginner
- Completion Time: 1.5 hours

Sketching with Graphite Putty
- Difficulty Level: Beginner
- Completion Time: 8 hours

Scratch Art with Color Accents
- Difficulty Level: Beginner/Intermediate
- Completion Time: 1-3 hours

Polymer Clay Fairy House
- Difficulty Level: Intermediate
- Completion Time: ~8 hours

Experiment with Resin Casting
- Difficulty Level: Beginner/Intermediate
- Completion Time: 1-2 hours (pre-cure)

Color-Splash Vision Board
- Difficulty Level: Beginner
- Completion Time: 3-4 hours

Etched Glass Holiday Gift Jar
- Difficulty Level: Beginner/Intermediate
- Completion Time: 1 hour

Create a colorful reminder of the good things in life
- Difficulty Level: Beginner/Intermediate
- Completion Time: 1 hour

Face Painting with Custom Stencils
- Difficulty Level: Beginner/Intermediate
- Completion Time: 1 hour

Art Deco Pendant with Polymer Clay
- Difficulty Level: Beginner
- Completion Time: 1 hour

Transfer Designs with Lazertran
- Difficulty Level: Beginner
- Completion Time: 15-20 minutes

Multimedia Painting with PanPastels
- Difficulty Level: Beginner/Intermediate
- Completion Time: 1-2 hours

Special Effects with Brusho Colors
- Difficulty Level: Beginner/Intermediate
- Completion Time: 1-2 hours

Make Your Own Paper Quilling Frame
- Difficulty Level: Beginner/Intermediate
- Completion Time: 10 hours

Make Your Own Greeting Cards
- Difficulty Level: Beginner
- Completion Time: 10-30 Minutes

Make Your Own Autumn Leaves Stained-Glass
- Difficulty Level: Beginner/Intermediate
- Completion Time: 1-2 hours

Make Your Own Magnetic Alien Message Board
- Difficulty Level: Beginner
- Completion Time: 2 hours

Make Your Own Compact Disc Drink Coasters
- Difficulty Level: Beginner
- Completion Time: 2 hours

Make Your Own Crayon Candles
- Difficulty Level: Intermediate
- Completion Time: 4 hours

Make Your Own Kite
- Difficulty Level: Intermediate
- Completion Time: 3 hours

Make Your Own Masquerade Ball Masks
- Difficulty Level: Intermediate
- Completion Time: 2.5 hours

Make Your Own Multimedia Greeting Card
- Difficulty Level: Intermediate
- Completion Time: 2 hours

Make Your Own Bouquet of Photo Flowers
- Difficulty Level: Beginner
- Completion Time: 1 hours

Make Your Own Rock Zoo
- Difficulty Level: Beginner
- Completion Time: 2 hours

Make You Own Custom Sketchbook
- Difficulty Level: Intermediate
- Completion Time: 2 hours

Make Your Own Stained Glass Window
- Difficulty Level: Beginner
- Completion Time: 2 hours

Make Your Own Oil Painting T-Shirt
- Difficulty Level: Intermediate
- Completion Time: 24 hours

Make Your Own Paper Mache Bowl
- Difficulty Level: Intermediate
- Completion Time: 24 hours