


Project Sheet
Dad's "Best Tools" Silhouette Sign
- Difficulty Level: Beginner-Intermediate
- Completion Time: 1-2 Days (with dry time)
Watch a video overview:
You know the saying, "If dad can't fix it, no one can!" Our dads somehow manage to collect tools year after year but still reach for their go-to favorites, no matter how rusty or worn down. More importantly, dads also expand their parenting tool belt with skills to support us through whatever challenges come our way. This simple tool silhouette sign is inspired by Dad's favorite tools such as his trusty - and rusty - hammer as a symbol for his greatness and strength. Inside the outline of the tools, the family writes personality traits and qualities that make Dad shine, while the background adds a memorable touch by freezing kids' handprints in time. Now, Dad can easily hang his go-to tools while being reminded of our gratitude and what makes him the best dad!
What You'll Need
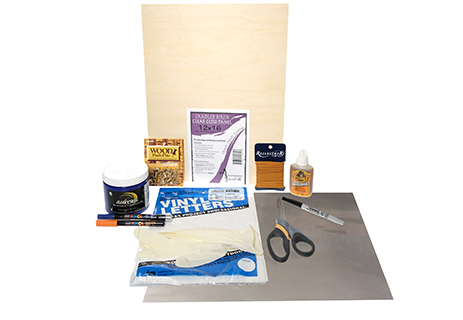
- Primed Wood Painting Panel (We used 12 in. x 16 in.)
- Gothic Vinyl Letters Sets by Duro (2 in.)
- Acrylic Clear Gesso Surface Prep by Liquitex (optional)
- Adhesive Vinyl Sheets by SRM Stickers (Any Finish/Color)
- Aurora Washable Finger Paint by Chroma Inc. (Your choice)
- Paint Markers by uni POSCA (Extra Fine Point for Precision)
- Latigo Lace by Silver Creek Leather Co. (In Chieftan)
- Wood Push Pins by Moore (Golden Oak)
- Profolio Hikigiri Scissors by Itoya (New & Trendy Product for Crafters!)
- Gorilla Glue
- Foam Brush
- Dad's Favorite Tools(4-6 Depending on the Wood Panel Size You Chose)
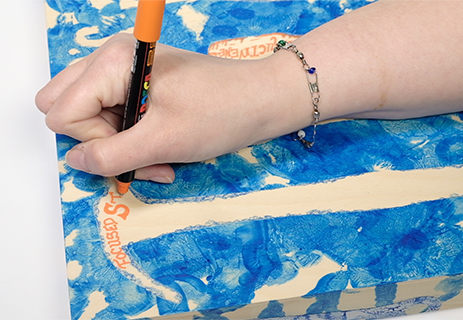
1. Prepping the Surface
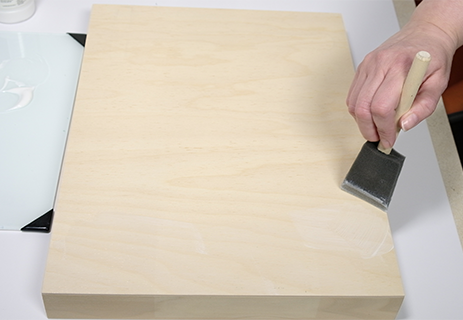 These panels come pre-treated with clear gesso which allows us to keep the wood texture and color in our design. We chose to apply two additional coats of clear gesso to the panel as well as to prepare the sides - also known as the cradle - so they may be painted as well. Use a wide brush to evenly apply the clear gesso in smooth strokes left to right for one coat and up and down for the second. Allow the clear gesso to dry between coats and completely before applying the vinyl pieces. This gesso may also be applied to prepare other unique wood surfaces that you may choose to repurpose for this project such as a pegboard.
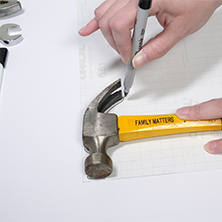
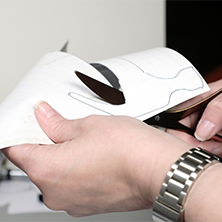
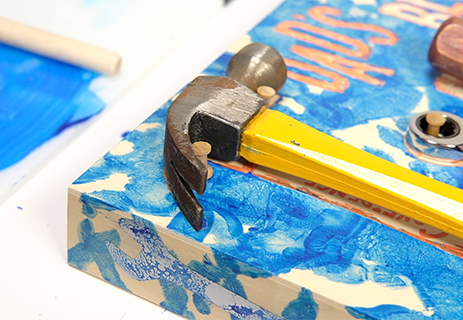
2. Tool Silhouette Tracing & Cutting
3. Vinyl Letter Placement
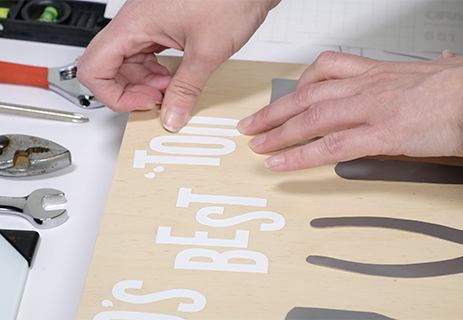 Plan your tool arrangement and visualization of the overall layout and message. Without peeling the adhesive backing, simply place the tool cutouts on the wood panel as place holders. Then, take out the vinyl letters and begin composing your message onto the wood panel.
Artistic Tip: The vinyl letters and cutouts can be rearranged as needed, but to make it easier, only press down a corner of each piece until you feel good about the overall arrangement.
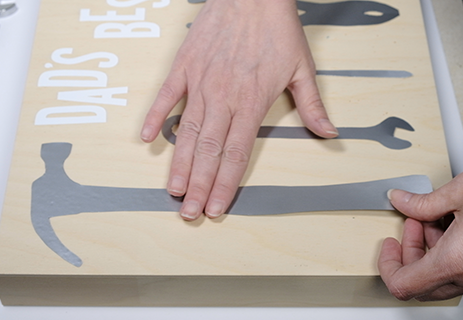 Once you are satisfied with your letter placement, peel off the backing on the tool silhouette cutouts and apply them smoothly onto the wood panel. Make sure to press the edges down firmly to reduce the amount of washable finger paint that may bleed under the tool shapes. We experienced more bleeding than anticipated, but the paint markers helped to sharpen the outlines.
4. Handprint Background with Finger Paint
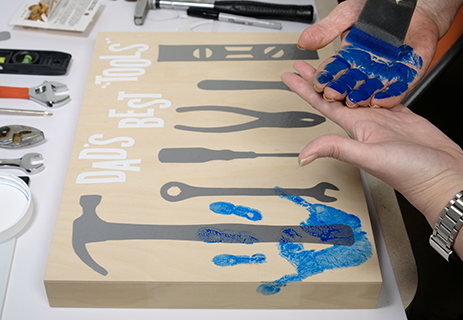 Begin by spreading the finger paint over your little one's hand. The paint has a thin consistency, so we applied the color with a foam brush for a thin, even layer without too many drips. You could alternatively prepare a small plate of paint for pressing hands. If choosing this method, we suggest a scrap surface for a couple of test prints or for removing excess with a preprint before applying to the board.
Place the coated hand onto the wood panel aiming the palms for the body of the tools. While firmly pressing, you may find a little additional pressure on top of the palm may help to ensure a full transfer of the handprint to the wood panel. Use both left and right hands, rotate the prints and continue layering until handprints cover the edges of the letters and tool cutouts. You can apply prints to the sides of the wood panel as well.
Creative Variation: Use different paint colors to represent different family members. Depending on your desired outcome, you may need to let the first color dry before applying a secondary set - as colors will mix and layer. Get creative! You could apply a different color to the fingertips ombre style or even a different color to each finger.
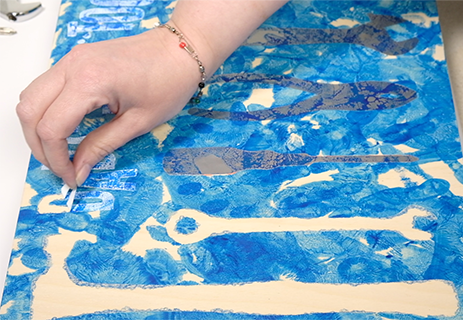 Allow the handprints to dry thoroughly, around 2 - 4 hours depending on how thick the finger paint was applied. Once the finger paint is completely dry, peel off both the vinyl sheet tool cutouts and the vinyl letters. We chose to reapply the vinyl tool cutouts to the sides as an optional component.
5. Paint Marker Application
 Now, you and your little ones can begin thinking of Dad's best qualities and personality traits. Brainstorm a list of traits on a piece of paper; this helps with kid's spelling too. Shake the paint marker gently, remove the top, and continuously press/pump the marker tip on a scrap piece of paper to start the paint flow for the first time. We also featured a brush tip that you click the bottom until you see color emerging from the marker tip. Begin writing the qualities inside the tool templates on the wood panel. You can also outline the tool templates with the paint marker for more dimension and clarity if you missed an edge with hand prints.
Creative Variation: If you want to get really creative, have your kids think of qualities & traits that signify dad while describing the nature of the tool you are labeling. For example, on the level tool template, we used ‘level-headed'. This can be a fun and intuitive exercise for kids to connect descriptive words with the literal meanings of an everyday object.
6. Decorative to Functional
 You could choose to make your project purely decorative and stop here, or you can follow these next steps to add a bit of functionality to your Father's Day gift.
7. Hanging with Latigo Lace
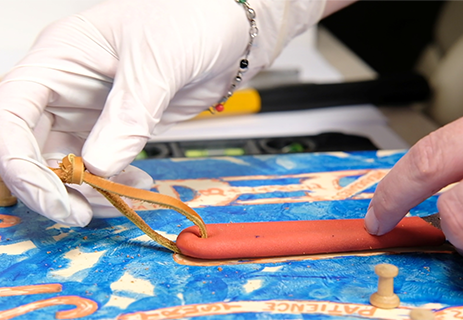 While the paint dries, cut Latigo Lace for tools that feature an open hole in the handles to hang the actual tools in place. Leave yourself enough lace to tie a secure knot. We ran the string through the hole in the tool and brought the two ends together. While holding both strands parallel to each other, tie a basic overhand knot in both strands simultaneously. Pull the knot tight towards the two ends. The doubled Latigo Lace forms a fairly thick knot and takes some additional pulling to get it tightly secure.
8. Wooden Push Pins as Small Hanging Knobs
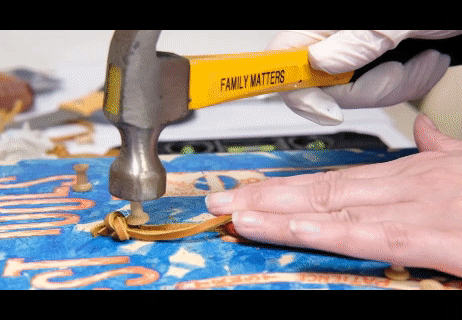 With the lace in place, match up the tool to the template on the wood panel, and place the wood pin on the inside of the loop, right under the knot. First, you will create a version of a pilot hole, using a wood pin. Grab a hammer and gently tap the wood pin into the wood panel until flush with the surface. Then, remove the wood pin and use pliers to pull out the metal point as it will likely separate from the wood pin. As these are designed for a lighter duty function, we'll be adding glue to repurpose them for the weight of our project. We reused the same pin for the pilot holes as the decorate wood tops can be split by the hammer, and this keeps the damage confined to one or two pins.
9. Securing with Gorilla Glue
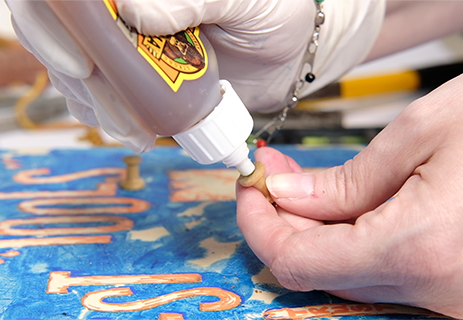 Gorilla Glue recommends dampening one surface prior to applying the adhesive. This helps to activate the glue. We applied a damp paper towel to the bottom of the wood pin and then inserted the pin into the opening of the glue bottle. Ensure the metal tip of the pin is covered in glue and reaches the wood pin base. Next, insert the wood pin into the pilot hole for a secure hold. The glue expands and a little goes a long way. Don't overdo it or you'll end up with visible glue around the pins. Allow to completely cure for 24 hours.
For tools that do not include a hole in the handle, arrange pins around areas that can distribute the weight. You can practice finding these points by trying to hold the tool between two fingers. Look for areas where the tools narrow as the tools may slide down into place. In some cases, we did not push the pin flush with the wood panel as the tool design benefited from slightly wider spacing. For example, the pliers were higher on the left than the right side, so the left pin is slightly raised from the surface. The Gorilla Glue still helped to keep the pin secure.
Apply the remaining wood pins with the same method described above.

There you have it! A fun DIY that challenges your little ones to connect the dots between descriptive words & everyday objects, while honoring Dad and all his best qualities! Have Dad hang this in his workshop or the garage for inspiration whenever he finds himself in need of a friendly reminder that he is one-of-a-kind!
Don't forget to share your Father's Day Silhouette Signs with us @Mister.Art
More Project Sheets

Glow-in-the-Dark Mirror
- Difficulty Level: Beginner-Intermediate
- Completion Time: 2 Hours

Tools Silhouette Sign for Dad
- Difficulty Level: Beginner-Intermediate
- Completion Time: 1-2 Days

DIY Acrylic Pour Bracelet
- Difficulty Level: Beginner
- Completion Time: 2-3 Days

DIY Mason Jar Planter
- Difficulty Level: Advanced
- Completion Time: 2-3 Days

Marbled Ornament
- Difficulty Level: Beginner
- Completion Time: 1-2 hours

Clay Pumpkin Jar
- Difficulty Level: Beginner
- Completion Time: 1-2 hours

Pro Glow Tape Skull
- Difficulty Level: Beginner
- Completion Time: 1 hour

Personalized Pencil Pouch
- Difficulty Level: Beginner
- Completion Time: 1 hour (plus drying time)

Decorate Your Own Birdhouse
- Difficulty Level: Beginner
- Completion Time: 2-4 hours

Transparent Photo with High Gloss
- Difficulty Level: Beginner
- Completion Time: 1.5 hours

Sketching with Graphite Putty
- Difficulty Level: Beginner
- Completion Time: 8 hours

Scratch Art with Color Accents
- Difficulty Level: Beginner/Intermediate
- Completion Time: 1-3 hours

Polymer Clay Fairy House
- Difficulty Level: Intermediate
- Completion Time: ~8 hours

Experiment with Resin Casting
- Difficulty Level: Beginner/Intermediate
- Completion Time: 1-2 hours (pre-cure)

Color-Splash Vision Board
- Difficulty Level: Beginner
- Completion Time: 3-4 hours

Etched Glass Holiday Gift Jar
- Difficulty Level: Beginner/Intermediate
- Completion Time: 1 hour

Create a colorful reminder of the good things in life
- Difficulty Level: Beginner/Intermediate
- Completion Time: 1 hour

Face Painting with Custom Stencils
- Difficulty Level: Beginner/Intermediate
- Completion Time: 1 hour

Art Deco Pendant with Polymer Clay
- Difficulty Level: Beginner
- Completion Time: 1 hour

Transfer Designs with Lazertran
- Difficulty Level: Beginner
- Completion Time: 15-20 minutes

Multimedia Painting with PanPastels
- Difficulty Level: Beginner/Intermediate
- Completion Time: 1-2 hours

Special Effects with Brusho Colors
- Difficulty Level: Beginner/Intermediate
- Completion Time: 1-2 hours

Make Your Own Paper Quilling Frame
- Difficulty Level: Beginner/Intermediate
- Completion Time: 10 hours

Make Your Own Greeting Cards
- Difficulty Level: Beginner
- Completion Time: 10-30 Minutes

Make Your Own Autumn Leaves Stained-Glass
- Difficulty Level: Beginner/Intermediate
- Completion Time: 1-2 hours

Make Your Own Magnetic Alien Message Board
- Difficulty Level: Beginner
- Completion Time: 2 hours

Make Your Own Compact Disc Drink Coasters
- Difficulty Level: Beginner
- Completion Time: 2 hours

Make Your Own Crayon Candles
- Difficulty Level: Intermediate
- Completion Time: 4 hours

Make Your Own Kite
- Difficulty Level: Intermediate
- Completion Time: 3 hours

Make Your Own Masquerade Ball Masks
- Difficulty Level: Intermediate
- Completion Time: 2.5 hours

Make Your Own Multimedia Greeting Card
- Difficulty Level: Intermediate
- Completion Time: 2 hours

Make Your Own Bouquet of Photo Flowers
- Difficulty Level: Beginner
- Completion Time: 1 hours

Make Your Own Rock Zoo
- Difficulty Level: Beginner
- Completion Time: 2 hours

Make You Own Custom Sketchbook
- Difficulty Level: Intermediate
- Completion Time: 2 hours

Make Your Own Stained Glass Window
- Difficulty Level: Beginner
- Completion Time: 2 hours

Make Your Own Oil Painting T-Shirt
- Difficulty Level: Intermediate
- Completion Time: 24 hours

Make Your Own Paper Mache Bowl
- Difficulty Level: Intermediate
- Completion Time: 24 hours